Background: Fibers become thread when a spinner or splicer twists them so that they lock together. Twist can be created by simply rolling a length of fibers down one's thigh or between one's fingers. The invention of a stick to wrap up the spun thread, to keep it from un-twisting, is a logical next step--and then twirling that stick to generate the needed twist comes naturally out of that invention, thus giving us the spindle.
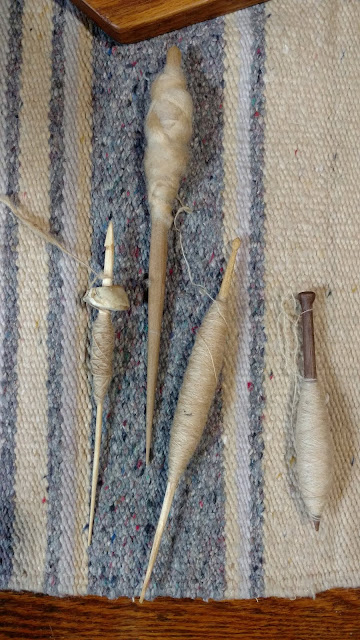 |
| A distaff and three spindles. Left: a spindle with bone whorl. Center: a spindle with the whorl removed once the cop of thread was heavy enough. Right: a spindle design that does not need a whorl. |
A spindle can be as simple as a straight stick, often shaved down to a point where the spinner's fingers will twirl it (a stick with a narrower diameter = more rotations per flick with the fingers). However, a weighted stick has more momentum and will twirl longer, so adding a weight (like a small rock, with a hole in it for the stick to fit through) helps spin the thread. Thus comes the invention of the whorl--a simple donut-shaped weight that helps the spindle whirl longer.
Whorls can range in size and shape and material, based on what materials are available to the spinner, and based on the thread being spun. A raw potato, jammed onto the end of the stick, works just fine for spinning wool yarn; whorls need not be fancy or expensive. Generally, the wider and flatter the whorl, the slower and longer the spindle will turn. The narrower and rounder the whorl, the faster the spindle will twirl, but it will also stop spinning and start to reverse direction faster, if the spinner doesn't prevent it. Small, rounded donut shapes appear to have been extremely common across most ancient cultures that used spindle whorls, regardless of whether the whorl was made of antler, bone, clay, wood, glass, stone or metal.
Having a removable spindle whorl is important when making small diameter yarn or thread. The weight of a whorl helps provide momentum for the spindle at first, but as a 'cop' (the newly spun thread, wrapped around the spindle shaft in an increasingly heavy cone) of thread builds up, the combined weight of thread and whorl together will begin to break the thread being spun. The weight of the cop of thread is by this point sufficiently heavy to act as its own whorl. So, the spinner simply takes the removable whorl off and continues spinning until the spindle is completely full. At that point, the full spindle can be set aside, and the whorl is jammed onto a new spindle stick, ready to keep on spinning. Weaving fabric requires great quantities of spun thread. Spindle sticks are easy to make and easy to store, while the more challenging piece to make--the whorl--can migrate from stick to stick to stick as the spinner fills up spindles, preparing to weave.
 |
| Warping a loom: the thread is pulled directly from the full spindle onto the warping board. Because the thread was stored on the spindle, it remained under tension and allowed the twist to set in the wool thread. |
Method: To recreate historical whorls, I started with
bone and choose to make the simplest form of whorl possible out of a fresh goat femur. After cleaning the femur by burying it briefly in the garden (where bugs do the work), I sawed off the round knob of the femur using a tiny hands saw, and then bored a hole through the middle using a pocket knife.
 |
| Bone, ready to go into the garden dirt for the bugs to remove the remaining tissue. |
 |
| Homemade saw with antler handle. |
The femur knob is quite lopsided and thus the whorl is uneven, but this seems to matter very little for the purpose of spinning fine thread with a very fast spin. The best advantage of a fresh bone whorl is its durability; if the spindle falls on a hard surface (like a tile floor), the whorl is still fine, whereas a ceramic or glass whorl would shatter.
Next, I made a few whorls out of
antler. These were heavier, in spite of having the same depth and diameter, because the antler itself is denser than the femur joint. I sawed off sections of the round antler, and attempted to bore the center hole with my knife. I found the material extremely hard to work in this way, and even soaking the antler overnight in water did little to speed the process. Eventually I switched to a brace and drill bit and drilled the center holes instead. I then used my knife to taper the holes to accommodate the tapered shafts of spindle sticks.
 |
| Top: distaffs with roving. Middle: spindles with femur and antler whorls. Bottom: a full spindle with the whorl removed, and a supported spindle that functions without a whorl. |
The antler whorls are relatively even and spin well, but they are significantly heavier than the bone whorl. Since they are still very narrow in diameter, these whorls spin fast, but their weight can break a very fine thread. A thicker thread will hold less twist before it stops the spindle and forces it to reverse direction; thus these whorls require the spinner to stop the spindle before it can untwist the thread. They work fine with the park-and-draft method of spinning.
One improvement that I plan to try with these antler whorls is to shape the outside of them, carving them into a spherical shape instead of their current cylindrical shape. This will remove some of the weight and hopefully improve their behavior as drop spindle whorls.
Next, I wanted to make
terracotta whorls. First, I needed clay. Fortunately, I live in the Appalachian mountains, where red clay is abundant.
To get the clay, I dug a hole, and took out some relatively clean clay chunks. I soaked them in rain water in a bucket, stirring a few times. This allows the sediment, dirt, roots and such to separate from the clay particles. After a few days of soaking, I poured the clay water through a scrap of window screen into another bucket, to get the large debris out.
Next, I left the bucket to sit (and the clay to settle) for a few days, and then poured off the extra water and let it bucket sit another day to dry a bit more. Then, I spread the soggy clay in a pan to dry for another few days, working it and flipping it periodically as it got firmer. Once it was dry enough, I separated the clay into chunks and wrapped most of them for storage, to keep them moist.
 |
| Red Virginia clay, ready to use. |
I worked the remaining clay into whorls of various historical shapes, using an awl to form the interior holes. Then I let the clay whorls dry for about 6 hours, until they were mostly dry on the surface, but not hardened. At that point, I polished and smoothed their exteriors so that they had glossy, hard surfaces, rubbing the clay with a stainless steel chop stick as a burnisher. Then I set them aside to finish drying.
 |
| Batch of whorls drying out. |
The next day, I baked the dry whorls in an oven at 200° for a few hours, then turned it up to 500°, to be sure they were dry all the way through and unlikely to shatter during firing. That evening, I built a fire in the fire pit outside, until it had a hot bed of coals. I shoved all of the coals to one side of the pit and let the other side cool a bit.
 |
| Dry whorls after burnishing and baking, ready to be fired. |
Meanwhile, I wrapped most of the whorls in loose tin foil covers, to keep the ash off them. I moved these closer and closer to the edge of the fire pit, until they were very hot to touch, then set them down into the cooler end of the fire pit. There I set firewood around and over them, as a protective structure, then shoveled hot coals slowly onto and around the pile until it was burning hot. Then I walked away and let it alone for an hour.
Over the next couple of hours, I gradually shifted the hot coals and logs away from the side of the pit where the whorls were, letting that side cool until the whorls and tin foil were safe to extract with gloves. I set them on the fire pit side again, then moved them back further and kept letting them cool until they were only warm to the touch. At that point, they were done!
I didn't wrap all of the whorls, because I wanted to see the difference it would make if they were directly exposed to the smoke and ashes. I'm glad now of it; the blackening is quite pretty! Only two whorls out of this whole batch (almost 30 whorls total) shattered when I set them in the fire pit. I assume that I simply hadn't preheated those two enough.
The interior holes on most of the terracotta whorls shrank significantly during the drying and firing. For my next batch, I will carve simple spindles and leave the clay whorls on them during the drying and baking, and take them off for the firing, in hopes that the holes will stay even and larger. I can use several of these as-is with some of my thinner spindles, but others require a bit of filing to enlarge the hole for use. The shrinkage was most notable with the large Greek classical-style whorls, which I assume contained more moisture inside them and consequently shrank more after I shaped and burnished them.
 |
| Fired terracotta, some black from the fire, some red because they were wrapped in tin foil, some shiny from burnishing and some coarse/matte without burnishing. |
These terracotta whorls are light, easy to make and essentially disposable; the burnishing I did made them nicer, but the ones that I left un-burnished are perfectly functional and less time-consuming. They are definitely fragile! I can shatter them by hand with enough effort, and they certainly do not survive being dropped onto hard floors. However, the firing was successful (they do not soften at all if soaked in water) and the clay was free. I made a variety of shapes and sizes, and I love how easy it was to customize these. Unlike carving wood, bone or antler, these required no sharp knives or saws--meaning a child could safely participate in making their own whorls. If they break, it's simple and free to make more. My favorites are the biconical, burnished whorls that I put directly into the fire without any tin foil, so that is what I'll make more of in the next batch.
 |
| Left: spindle with biconical burnished whorl placed as a bottom whorl. Right: spindle with flat disc burnished whorl as a top whorl. |


Comments
Post a Comment
Questions and suggestions for further research are welcome. No selling, no trolling, and back up any critique with modern scholarly sources. Comments that do not meet these criteria will be discarded.